Learning Hub
 Sign up to our newsletter
Life Lines has created a digital ICU patient e-diary using the aTouchAway™ application that can replace paper ICU diaries.
The ICU e-diary also enables family members to make entries from home via their secure aTouchAway account on their own device (smartphone, tablet, or computer).
ICU patient e-diaries are designed to fill memory gaps and mitigate psychological distress. E-diaries can positively impact psychological recovery of ICU survivors. They also help family members to process experiences.
Our ICU e-diary enables entries from any member of the ICU interprofessional team via bedside or desktop computers or tablets. The ICU e-diary can be downloaded by a member of the ICU team and then returned to the patient in a PDF format at a later date.
The ICU e-diary was launched at Guy’s and St Thomas’ NHS Foundation Trust in October 2021 and has received positive feedback from both family members and staff.
"The biggest benefit for me as a family relative using the ICU e-diary is that I can put my thoughts and feelings down on the ICU e-diary from home. It’s accessible and easy to use." - Feedback from a family member.
"The ICU e-diary is advantageous as it is easy to access. It can’t get lost if the patient is transferred to a different unit." - Feedback from an ICU nurse.
ICU e-diary resources for clinical teams
Advice for clinical staff on getting started with the ICU e-diary
This provides the following guidance:
-
Making a patient ICU e-diary profile;
-
Making entries in the ICU e-diary;
-
Linking family members to the patient's ICU e-diary account and adding them as a care team member;
-
Guidance for staff on how to download a completed ICU e-diary from aTouchAway to PDF format.
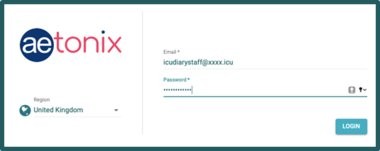
- Open the aTouchAway app on the ICU computer or tablet using Google chrome.
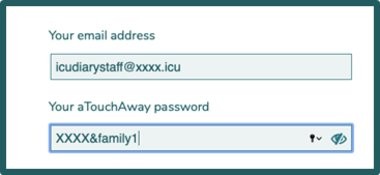
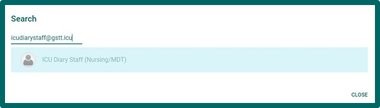
- Log in to aTouchAway with the generic login & password chosen for the ICU e.g. icudiarystaff@xxxx.icu and password xxxx&family1. Note: The ICU e-diary login and password is different from the virtual visiting login/password.
-
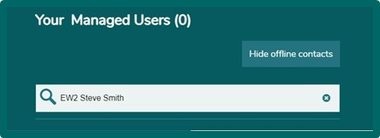
Double check that the patient does not already have a profile set up for virtual visiting to avoid duplicate accounts. Find the patient by searching for the name of the ICU or the patient’s name e.g., EW2 or Steve Smith.
-
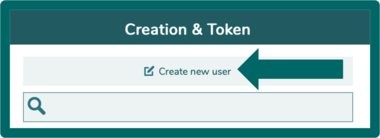
If there is no patient profile, click on the ‘Creation & Token’ button on the bottom right-hand side of the screen to create a new patient profile.

-
Click on ‘Create new user’ at the top of screen to bring up the ‘new user’ profile page.
-
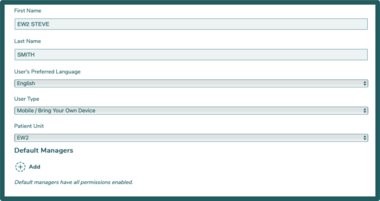
Fill out the profile with the patient’s details.
-
If there are multiple ICUs in the hospital, make sure that in the ‘First Name’ row, type the ICU name before the patient’s first name. This makes it easier to search for a patient in the app by narrowing the search to the right patient in the right unit, especially if there is more than one patient with the same name. e., First name: EW2 STEVE, Surname: SMITH.
-
Keep the ‘User’s Preferred Language’ as English (as it will keep the app and content in the English language).
-
Keep the ‘User Type’ as ‘Mobile/Bring Your Own Device’ as this will keep the profile visible on other devices (tablets). Pick the correct ICU unit in ‘Patient Unit’.
-
-
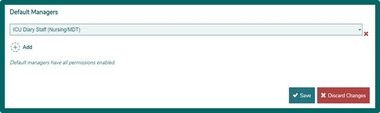
Before saving the new user make sure to click on the ‘+ Add’ symbol under ‘Default Managers’. Choose ‘ICU Diary Staff (Nursing/MDT)’ as the Default Manager to be able to create an ICU e-diary. Click on ‘Save’ button to finalise the action.
-
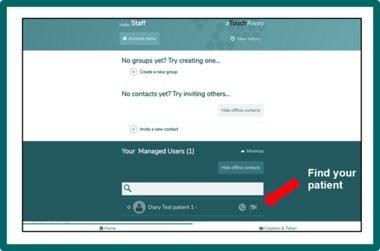
Once save is pressed, go back to ‘Your Managed Users’ and type in the patient’s name and ICU. Click on the patient’s name to enter their home page profile as the image below.
-
-
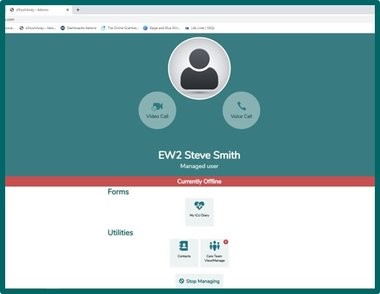
The user profile should look like the picture below. If there is no ‘My ICU Diary’ in the Forms section, the ‘ICU Diary Staff (Nursing/MDT) account has not been added as the default manager. In this case, restart another profile page and delete the old profile.
- Click on ‘My ICU Diary’ form to open the ICU e-diary form as shown below
- Start making an ICU e-diary entry on this form. Once finished, save your form.
- NOTE: Read or download the example ICU e-diary guidelines and see example ICU e-diary entry content.
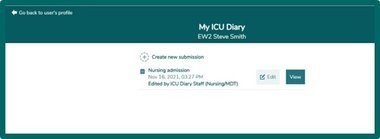
- Once the e-diary entry is finished and saved, the form will appear as shown in the picture below.
- Any staff member can edit and review their own entry and entries from another clinical team member. Please do not delete entries. It is advised that your organisation identifies one or two staff members who are given permissions to edit entries if required – i.e. if incorrect information is added or inappropriate language is used.
- Family members will not be able to view staff entries in the ICU e-diary.

Examples of clinical team entries
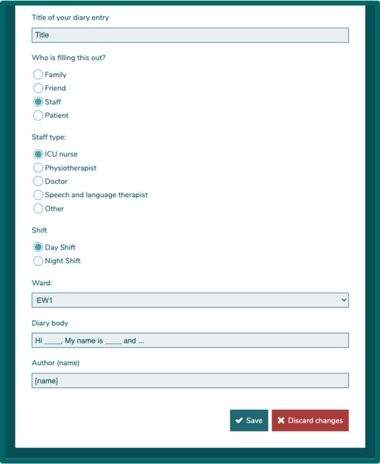
This image is the screen seen when making an ICU e-diary entry:
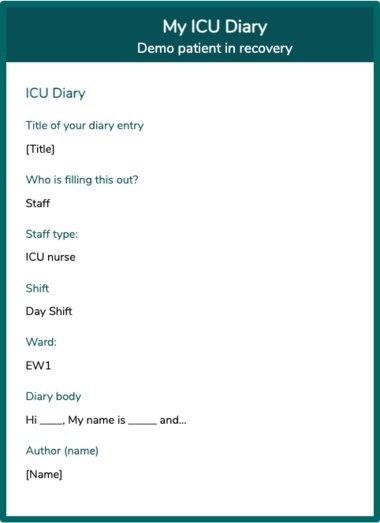
This image shows how the ICU e-diary will appear on the app once saved:
Family member entries
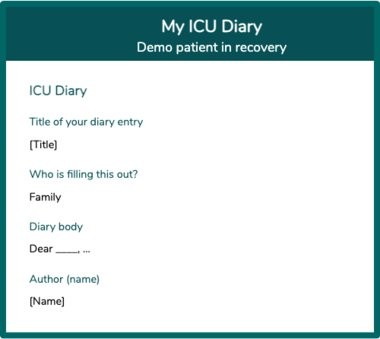
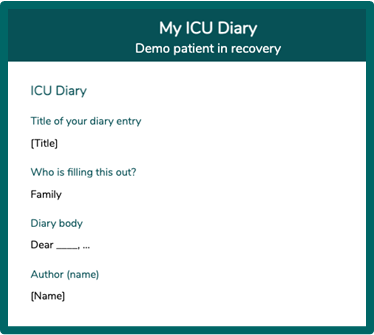
This image is the screen seen when a family member makes an ICU e-diary entry:

This image shows how the ICU e-diary will appear on the app once saved:
- When the patient is selected the following image appears. This is the patient’s home page profile:
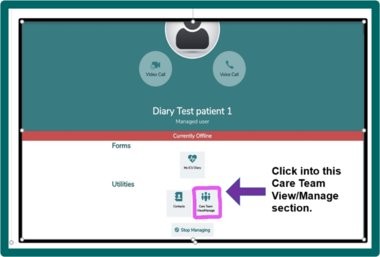
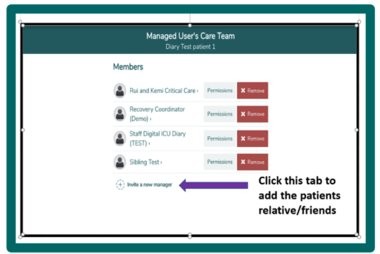
- Click on the ‘Care Team View/Manage’ box to grant the family member access to the ICU e-diary. This makes the family member part of the ‘Care Team’.
- The family member MUST be made a ‘Care Team Manager’ to gain access to the ICU e-diary.
- To invite a patient’s family or friend, click on ‘Invite a New Manager’.
- The instruction for the next stage differs depending on whether the family member is already registered with aTouchAway for virtual visiting or a new user.
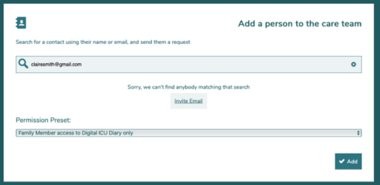
- To find out if they are already registered, type in the email address of the family member i.e. the email address used / or planning to use, to register on aTouchAway, in the ‘Search for a contact using their name or email and send them a request’ box.
-
If the family member does not exist yet, the system will not identify the email contact and the words ‘Sorry, we can’t find anybody matching that search’ will appear.
-
Click on ‘Invite Email’, then select the language for the automated email and an automated email will be sent to the family members email account. The email invites the family member to ‘join the Aetonix social network’. For the family member to accept the invitation, they must download the aTouchAway app and create an account by clicking on the ‘registration link’ within the email. (More details on the family member steps are found in the family section)
-
On the ‘Permission Present’, scroll the options and pick the ‘Family Member access to Digital ICU Diary only’ option.
-
Click on the green ‘Add’ button to add the family member to the patients ‘Managed User’s Care Team’. Once the family member logs in they will be automatically assigned as a ‘managed user’ for their family member.
-
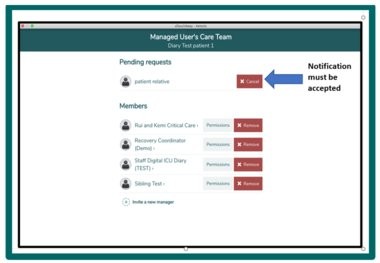
If the family member is already signed up to aTouchAway, the family member’s account name will appear under ‘People to Invite’. Click on the name to select. In the ‘permission Preset’ box, select ‘Family Member access to Digital ICU Diary only’ option. Click on the green ‘Add’ button to add the family member to the patients ‘Managed User’s Care Team’. The family member will then be sent the ‘managed user request’ to accept or decline (more details on the family member steps are found in the family section).
-
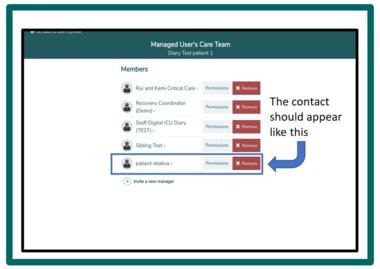
Once the family member has accepted the ‘managed request’, the family member contact will be listed in the ‘Managed User’s Care Team’ page as displayed in the image below:
View or download guidance on using the ICU e-diary for clinical teams here.
- Login to the Aetonix dashboard via the internet with this URL: dashboards.aetonix.com. Bookmark this link. Aetonix works best using Google Chrome.
- Use the same login name and password for the Aetonix dashboard as used for the ICU e-diary aTouchAway account e.g. icudiarystaff@xxxx.icu and xxxx&family1
Make sure this is set to the United Kingdom region. Only staff should log into the dashboard. This is not accessible to family members.
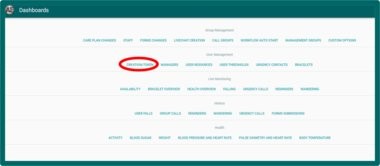
On the Dashboards homepage, click onto the word ‘creation/token’ under ‘User Management’ section.
In ‘User Creation/Token’, type the patient’s name in the search box and when it appears, click on ‘select’, to highlight the patient’s name.
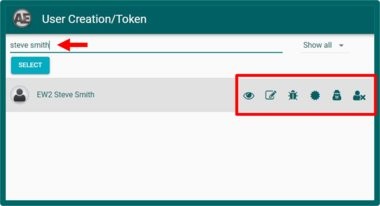
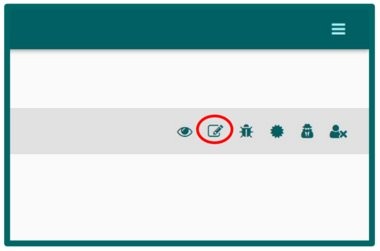
On the right-hand side of the highlight tab, there are six different icons. Click on the ‘edit’ symbol to view the patient’s profile.
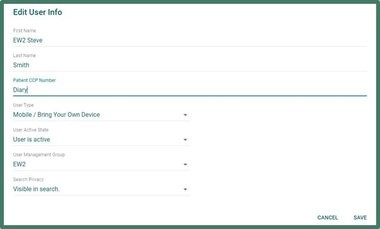
On the ‘Edit User Info’ page, change the ‘user active state’ to ‘user is active’ and change ‘search privacy’ option to ‘visible in search’. Once these settings are changed, press the save button. This will change the settings to make a deactivated profile, active again and possible to retrieve the e-diary.
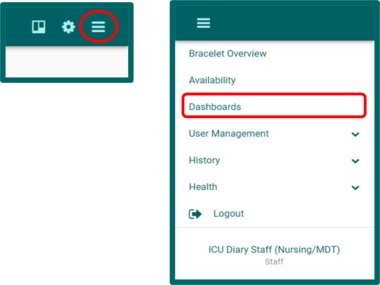
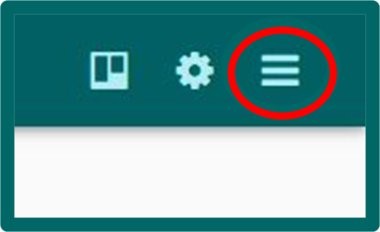
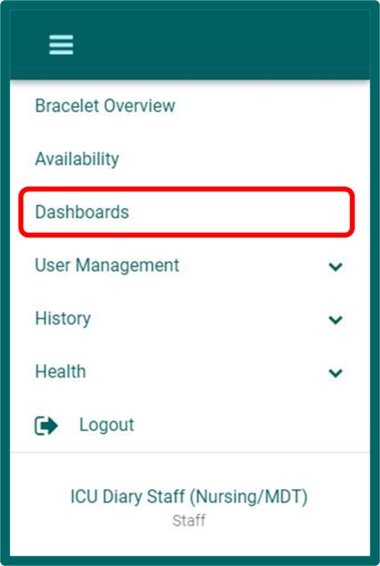
Once this is done, go back onto the main dashboard by clicking on the three-line tab on the top right corner of the screen (circled in red). Look down the drop down menu to select ‘Dashboards’ to get back to the main Dashboards homepage.
From the Dashboard homepage, click on ‘Managers’ under the ‘User Management’.

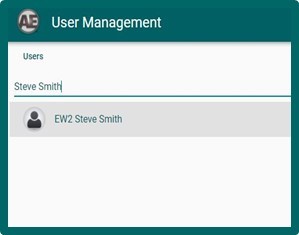
In the ‘Managers’ section, there are two columns, ‘Users’ and ‘Managers’ that are presented side by side. Type the patient’s name in the ’Search Name or Client Number’ box in the ‘Users’ section. When the patient’s name appears, select the name by highlighting the patient.
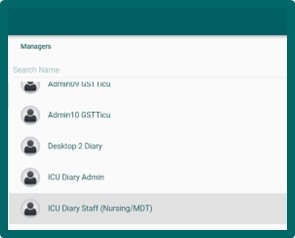
On the opposite ‘Managers’ column, a list of managers will appear, indicating how many managers this patient account has. A manager is anyone who can make an ICU e-diary entry. The login account ‘ICU Diary Staff (Nursing/MDT)’ should be visible as a manager. If the login account name ‘ICU Diary Staff (Nursing/MDT)’ is not visible in the list of managers, the login account must be added by following steps 9-12 below. If the login account ‘ICU Diary staff (Nursing / MDT)’ is visible, skip to step 14 below.
Click on the blue ‘ADD’ toolbar on the bottom right-hand corner, underneath the ‘Managers’ column.
![]()
Type in the login email address for example ‘icudiarystaff@xxxx.icu’ in the search box. This brings up the manager account name of ‘ICU Diary Staff (Nursing/MDT)’. Click on the account name to highlight it blue. Once this is done, close the search box.
The generic account name ‘ICU Diary Staff (Nursing/MDT)’ is then automatically added to the patient’s ‘managers’ list, and it should be visible. Scroll down the list of account names on the manager’s column to ensure that the ‘ICU Diary Staff (Nursing/MDT) is listed as a manager.
Once this is done, go back onto the main dashboard by clicking on the three-line tab on the top right corner of the screen (circled in red). Look down the drop down menu to select ‘Dashboards’ to get back to the main Dashboards homepage.
On the Dashboards homepage, click onto the word ‘creation/token’ under ‘User Management’ section.
In ‘User Creation/Token’, type the patient’s name in the search box and when it appears, click on ‘select’, to highlight the patient’s name.
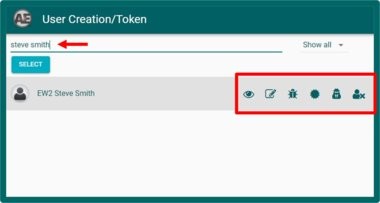
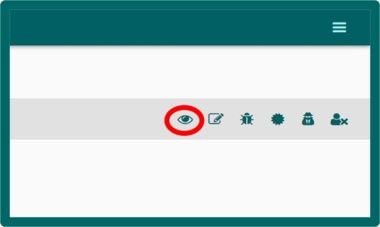
On the right-hand side of the highlight tab, there are six different icons. Click on the ‘eye’ symbol to view the patient’s profile.
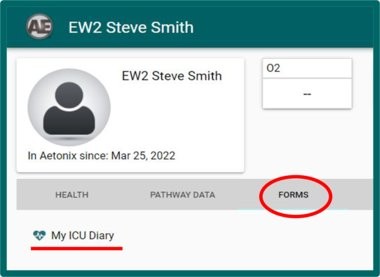
The patient’s profile will appear with multiple tabs beneath. Click on ‘Forms’ to reveal ‘My ICU Diary’ with the heart symbol.
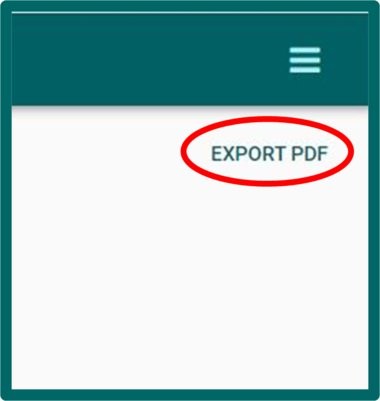
The ICU e-diary can then be exported as a PDF. On the top right-hand corner of the screen, underneath the three lines, click the ‘Export PDF’ button to convert the ICU e-diary into PDF format.
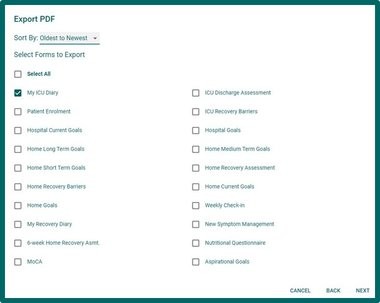
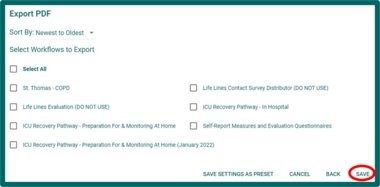
A box will appear on the screen allowing export of the ICU e-diary into PDF format. Click the next button exactly four times to get to the required ‘Export PDF’ page to choose which documents to export.

Once the ‘Export PDF’ page is reached as shown below, tick the ‘My ICU Diary’ box and change the option on ‘Sort By’ button to ‘Oldest to Newest’ to ensure that the diary is saved in chronological order. Click ‘Next’, to save the document.
Continue to press ‘next’ until the end of the options is reached and the ‘save’ button appears at the bottom of the ‘Export PDF’ page. Press ‘save’ to generate and download the PDF file.
A PDF file will be generated with the patient’s name and appear on the bottom screen of your device.

Open the PDF document and check all the correct details are present. The PDF should appear as seen in picture below, named ‘Patient Summary Report’. It will contain all the contents of the ICU e-diary.
NOTE: This PDF document can be printed out or the PDF document attached in an email sent to the patient or the patient’s family.

This document will be saved on the desktop in the ‘downloads’ folder. Be sure to store this PDF document in an appropriate password protected folder only accessible to those staff involved in the return of the ICU e-dairy.
View or download guidance on downloading the ICU e-diary and creating a PDF for clinical teams here.
For our ICU e-diary troubleshooting document, click here.
ICU e-diary resources for families
- If you have used aTouchAway before for virtual visiting, you do not need to register again. The ICU staff will be able to find your account on the aTouchAway app and will send you a notification. Move to point 8 in the instructions
- If you are new to aTouchAway, firstly download the Aetonix aTouchAway app from Google Play for Android phones/tablets or the App store for iPhones/tablets. On an Android phone/tablet, go to the play store. Type ‘aTouchAway’ in the search box and the Aetonix aTouchAway app should appear. Click on Aetonix aTouchAway.Mobile app and then click Aetonix aTouchAway install. Accept the Aetonix Licence agreement and click ‘Register aTouchaway’.
-
On an iphone/ipad, go to the App store. Type ‘aTouchAway’ in the search box and the Aetonix aTouchAway app should appear. Click on the download icon. An Apple ID and password will be required. Accept the Aetonix Licence agreement and click ‘Register aTouchaway’.
-
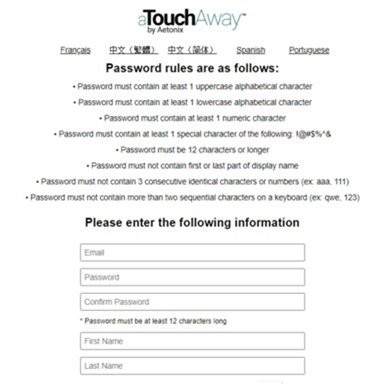
Once the app is downloaded, complete the form to set your password (see image below). Your first name, and last name will need to be entered as well as your email address and a password. Please register the account under your full name. This makes it easier for the ICU staff to find your user details and add you as a contact. Also register with an email account this is regularly used. It is important to remember the password, so make a note of it somewhere safe.
-
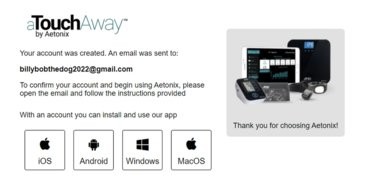
The following pop up will appear informing you that an email has been sent. Open this email (check your junk folder as it may go there), and follow the instructions provided.
-
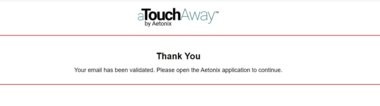
It will ask you to click a link to validate the account. Once done this image will appear, thanking you and informing you your email has been validated.
-
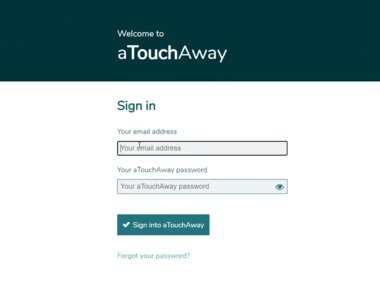
Go to the app, and sign in as image below, with your email address and password created earlier.
-
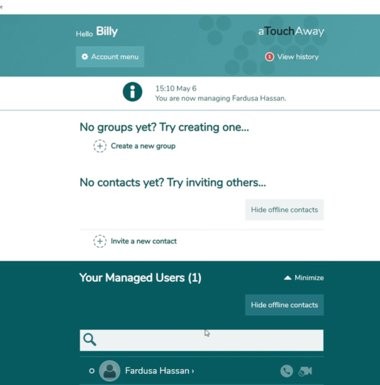
Once logged in to the aTouchAway app, your relative’s name will appear under the heading of ‘Your Managed Users’. Click on your relative’s name to access the ICU e-diary. There should only be one name under ‘your managed user’. Now go to instructions no.10.
-
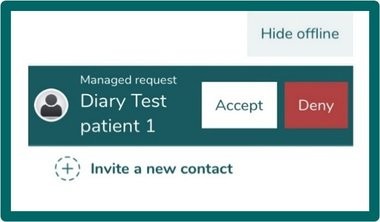
If you have used the aTouchAway app before and already registered, the next time you log in, you will see the following box, with a ‘managed request’ of the name of their relative. Click on ‘accept’.
-
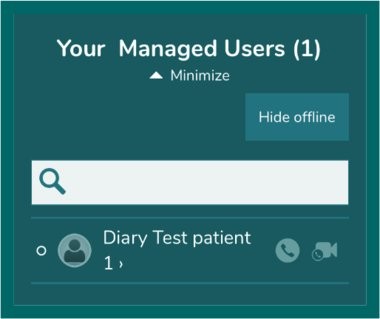
Once ‘Accept’ has been pressed, your relative’s name will appear under the heading of ‘Your Managed Users’. Click on your relative’s name to access the ICU e-diary. There should only be one name under ‘your managed user’.
-
Click on ‘My ICU Diary’ in ‘Forms’ to open the ICU e-diary.
-
A form will appear as shown in the image below, with the heading ‘MY ICU Diary – Create new submission’. This allows you to create a new ICU e-diary entry.
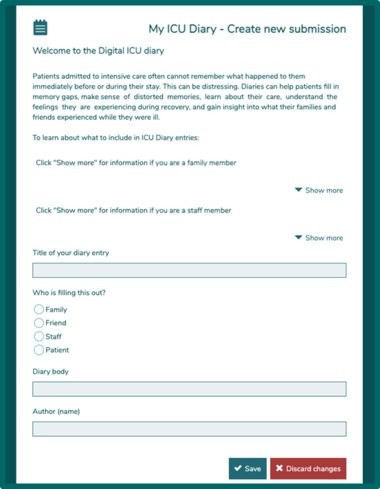
-
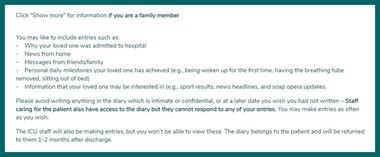
Below are some suggestions as to what to include in an ICU e-diary entry. Click ‘Show more’ for examples as shown below.
-
When you have finished typing your ICU e-diary entry, click the ‘save’ button on the bottom of the form and your ICU e-diary entry is complete.
-
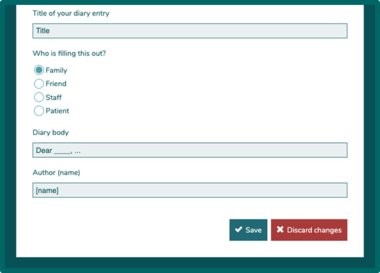
This is how the entry will appear, on the app once saved.
-
To make new diary entries click ‘Create new submission’.

-
Family members are not able to view ICU e-diary entries made by staff or by other family members, only their own entries. The ICU e-diary belongs to the patient and will be returned once the patient has left the ICU.
View or download guidance to use the ICU e-diary for family members here.